Texture blending modes — what each one actually does
- Status: unverified
- Applies to: Metashape Pro 2.x ; Metashape Standard 2.x
- Edition: Pro / Standard
- Diátaxis: explanation
- Confidence: medium
- Last reviewed: 2026-06-05
Confidence: medium overall. The mode-by-mode behaviour documented below is high-confidence — each finding is directly observable in the included figure, with a derivation linking the input properties (camera colours, intensities, cam3's roll) to the predicted output. The medium rating reflects two limits: (a) the Natural mode (2.3+) could not be exercised on the synthetic test bed because it requires depth maps from a real alignment plus a Vulkan-capable GPU; (b)
Chunk.buildOrthomosaicaccepts the sameBlendingModeenum but the user manual documents only three of the modes for ortho — what the others do for ortho is a separate Tier 3 question.
Problem
Chunk.buildTexture accepts six different BlendingMode
values. The user manual gives a one-paragraph description of
each, but several of those descriptions are easily misread:
- Max Intensity — does it mean per-channel max, or per-pixel selection of the source camera with the brightest pixel, or per-region selection of the brightest source image?
- Disabled — the manual says "the image to take the color value for the pixel from is chosen like the one for the high frequency component in mosaic mode." What does that mean visually?
- Mosaic (default before 2.3) and Average — both blend contributions, but with different weighting strategies. When do they produce visibly different output?
This article answers those questions with a controlled experiment: a flat textured plane viewed by four cameras (one of which carries a small camera roll, modelling imperfectly recovered alignment), each photographing a checkerboard with a different colour. The output texture's centre region is where all four cameras overlap and is where each blending mode's behaviour shows.
Context
The BlendingMode enum has five values on Metashape 2.2 and
six on 2.3 (which added NaturalBlending and made it the new
default for buildTexture):
| Mode (label / enum) | 2.2.3 | 2.3.1 | Documented for buildTexture |
Documented for buildOrthomosaic |
|---|---|---|---|---|
MosaicBlending |
✓ | ✓ | ✓ | ✓ (default) |
AverageBlending |
✓ | ✓ | ✓ | ✓ |
MaxBlending |
✓ | ✓ | ✓ | — |
MinBlending |
✓ | ✓ | ✓ | — |
DisabledBlending |
✓ | ✓ | ✓ | ✓ |
NaturalBlending |
— | ✓ (default) | ✓ | — |
The Python API exposes the same enum to both buildTexture
and buildOrthomosaic, and both functions accept any of the
six values without raising. The user manual documents Mosaic /
Average / Disabled for buildOrthomosaic — what the other
three modes do for ortho output is not documented. This
article focuses on buildTexture; the ortho question is left
as a Tier 3 follow-up (see Caveats).
The cluster of five modes Metashape exposes is not unique to its renderer. The same primitive operations (per-pixel weighted-average, per-pixel max/min, per-region winner) appear in every multi-image compositor; the value of having them named in the API is choosing the right primitive for the photometric and geometric properties of the input images.
What each mode actually does
The experiment uses a single deliberately-engineered scene:
- A flat 1m textured quad as the model.
- Four cameras placed near the corners of the quad, at altitude 1m, looking nadir, with sensor-width-equal focal length (53° FOV). The placement gives asymmetric coverage: each corner of the texture is seen by exactly one camera, the centre is the only region seen by all four, and edges are seen by 2 or 3 cameras.
- Each camera photographs a checkerboard whose "on" squares are a different colour: cam0 = red, cam1 = green, cam2 = blue, cam3 = yellow. The checkerboard geometry is identical across all four — every camera's image places its squares at the same world surface positions.
- Cam3 carries a 12° roll around its optical axis. This models a real-world failure mode where a camera's roll component is imperfectly recovered during alignment. The rolled cam3 samples the surface at a tilted in-plane orientation; in the central overlap region this disagrees with the un-rolled cam0/1/2 sampling.
- The texture atlas is 256×256 px.
This single test discriminates all five blending modes simultaneously. Three properties are made visible:
- Single-camera regions are deterministic. All five modes produce identical output at the four corners — the only camera that contributes there is the unique camera whose footprint covers that corner.
- Per-channel arithmetic vs whole-image winner. Yellow
has the highest pixel intensity (
(255+255+0)/3 = 170); red, green, and blue all tie at intensity 85. The Max and Min modes' choices in the central overlap region reveal whether the mode operates per-channel or per-image. - Geometric misregistration. The rolled cam3 contribution overlaps with the un-rolled cam0/1/2 contributions in the central region; each mode handles this disagreement differently.
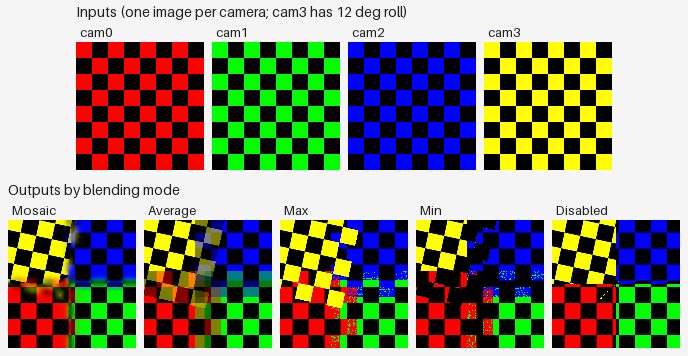
| Mode | Behaviour visible in the figure |
|---|---|
| Mosaic | Each region (corner + edge band) takes its colour from one camera's checkerboard; the seams between regions show smooth low-frequency colour gradients. The central overlap shows softened transitions between cameras' contributions rather than a single winning colour. |
| Average | Per-channel mean of the four input checkerboards. The single-camera corners keep their bright original colours; the central overlap region averages to a darker olive-green tone because averaging four saturated colours plus their black squares pulls toward low saturation. |
| Max | The whole-image-wins behaviour produces a yellow-dominated central region — yellow has the highest pixel intensity (170 vs 85 for red/green/blue). The yellow region is tilted 12° because it comes from rolled cam3; the rotation is the most visually striking signature of the rolled camera in any mode. |
| Min | Every pixel where at least one camera shows black goes to black. The central region is dominated by black plus a chaotic noise pattern of red, green, and blue pixels — these are pixels where one camera shows its colour and the rest show black. Red, green, and blue all tie at the lowest non-zero intensity (85), so the choice between them is non-deterministic; the noise visualises the tie-breaking. |
| Disabled | The per-region winner heuristic produces a sharp four-quadrant output: cam0 (red) at bottom-left, cam1 (green) at bottom-right, cam2 (blue) at top-right, cam3 (yellow + tilted) at top-left. The boundary at cam3's quadrant is tilted 12° because the rolled camera's projection edge is tilted. No blending at all between regions. |
Three findings stand out from the figure:
Finding 1 — Max and Min do not compute per-channel max /
min. If they did, Max in the central region would yield
(255, 255, 255) (white) — the per-channel max of the four
inputs — and Min would yield (0, 0, 0) (black) at every
colour pixel. Instead, Max picks one image per pixel —
typically yellow, because yellow has the highest pixel
intensity in the inputs — while Min picks one image by
lowest intensity, and the R/G/B tie produces a noise pattern.
The user manual's wording "the image which has maximum
intensity of the corresponding pixel is selected" is
technically accurate but easy to read as "per-channel max" by
a reader skimming.
Finding 2 — The four corners are deterministic across all modes. Yellow at top-left, blue at top-right, red at bottom-left, green at bottom-right — this is identical in every output. Where only one camera contributes, no blending mode can produce anything other than that camera's content. This is a useful diagnostic property: any difference in the four corners between two runs would indicate a non-blending issue (e.g., a camera contributing to a region the geometry implied it should not reach).
Finding 3 — The rolled cam3's contribution is tilted. In the Disabled output, cam3's quadrant boundary is tilted 12° relative to the others. In the Max output, the yellow- dominated central region is also tilted — it follows cam3's rolled orientation rather than the world axes. This is the key visual signature of a camera with imperfectly- recovered roll: not "one camera projects a rotated image into the texture" but "the projection footprint of that camera is itself rotated in the texture."
Implications — when to use which mode
The choice of blending mode is a tradeoff between three properties: photometric fidelity, sharpness, and tolerance of imperfect registration.
| Mode | Best for | Avoid when |
|---|---|---|
| Mosaic | The default for non-Natural workflows. Produces sharp output (high-frequency winner) with smooth seams (low-frequency blend). Photorealistic texture on aerial / mapping projects. | Severe photometric inconsistency between cameras (Average is more forgiving) or strong moving-object artefacts (Natural in 2.3+ has explicit ghost suppression). |
| Average | Diagnostic check — Average ghosts misregistered contributions across the central overlap region, making registration quality visible at a glance. Also useful when sharpness is unimportant but uniform global colour is. | Production texture on photogrammetric data — produces visibly soft / ghosted results when registration is imperfect. |
| Max | Specialised use cases such as shadow removal on plane-of-symmetry datasets where per-region brightest-image-wins approximates "no shadow on this pixel." | General texturing — the per-region winner-takes-all loses local detail and exposure consistency. |
| Min | Specialised use cases such as highlight removal under specular lighting where the dimmest-image-wins approximates a diffuse-lit response. | General texturing — same as Max. |
| Disabled | Useful when the alignment is good but the photometric variation is bad — produces a sharp, single-source-per-region texture without any blending artefacts. Also the only mode that does not require all cameras' contributions to be processed jointly, so it is the fastest. | Mosaic is sufficient for nearly all production cases; Disabled trades visible seams for processing speed. |
| Natural (2.3+) | The 2.3 default. According to the user manual, Natural combines per-region best-image selection (like Disabled) with frequency-domain blending (like Mosaic), and can suppress moving-object artefacts. The surrounding 2.3 API changes are documented in Texture in Metashape 2.3. This article does not test Natural empirically — see Caveats. | When you need byte-for-byte reproducibility against pre-2.3 textures (use Mosaic). When the GPU does not support Vulkan (Natural is GPU-bound on 2.3). |
Test methodology and reproducibility
The reproducer is scripts/verify_blending_modes.py in this
repository. It is a single Python file with no external state.
Steps:
- Synthetic dataset. Construct a 1m flat quad as an OBJ
with explicit UVs, four cameras at altitude 1m placed near
the four corners of the plane (at
(±0.4, ±0.4, 1.0)), and four 256×256 synthetic colored-checkerboard images (one per camera). Cam3 has a 12° roll baked into its camera-to-world transform — a deliberate misregistration modelling imperfectly-recovered roll. - Drive Metashape via the API. Add the photos, attach
each camera to a shared 256-px focal-length sensor, set the
camera transform manually (no alignment step), import the
quad. The cameras are set to
fixed_calibration = True. - For each blending mode, call
chunk.buildTexture(blending_mode=<mode>, texture_size=256)on a fresh chunk and save the resulting texture as PNG. - Measure, per mode, the centre pixel, the four corner
pixels, the texture-wide mean, and the unique-colour count.
Save all measurements to
summary.json. - Generate the article figure — one composite JPEG
showing the four input images on top and the five per-mode
output textures below. Quality 82, JFIF-only metadata (no
EXIF). Re-running the script does not overwrite the
existing figure unless
--regenerate-figuresis passed.
The script does not require an active Pro license:
buildTexture and Texture.image().save() both work with the
"No nodelocked license found" warning on 2.2.3 and 2.3.1.
Run:
Demo verified: ✓ on 2.2.3 (5 modes), ✓ on 2.3.1 (5 modes; Natural skipped — see Caveats).
Caveats
- Asymmetric coverage is a design choice. The test bed places each camera near one corner of the model so that:
- each corner of the texture is seen by exactly one camera;
- only the central region is seen by all four cameras. This is more representative of real photogrammetric overlap (where most surface points are visible from a subset of cameras, not all) than a perfectly symmetric grid above the plane. The cost is that the central region is small (about 10% of the texture by area), so the modes' "personality" is concentrated in a small portion of each output.
- Cam3's 12° roll is a deliberate single-axis misregistration. Real-world photogrammetric failures have three rotational degrees of freedom (roll, pitch, yaw) plus three translational ones. A roll-only misregistration is the simplest non-trivial case and the easiest to interpret visually; the modes' qualitative behaviour likely generalises to the other rotational axes, though this article does not test the other axes empirically.
- Natural blending could not be exercised on the synthetic test bed. Two preconditions block it:
- Depth maps required — Natural's per-triangle
best-image selection uses sharpness, ghost detection, and
occlusion checks that depend on depth maps, which require
a tie-point cloud from
matchPhotos+alignCameras. Synthetic checkerboard images cannot be aligned this way without features the alignment can match across cameras. - Vulkan GPU required — calling
buildTexture(blending_mode=NaturalBlending,
     source_data=DepthMapsData)
errors withFailed to load vulkan library!on Apple-silicon Macs without a Vulkan driver. The Python API does not gate on this; the failure surfaces at execution. Reproducing Natural blending side-by-side with the other five modes is therefore a Tier 3 follow-up on a real dataset with an aligned chunk and a Vulkan-capable GPU. buildOrthomosaicaccepts the same enum but the manual documents only three modes for ortho. WhatbuildOrthomosaic(blending_mode=MaxBlending)actually does for ortho output is undocumented and a separate empirical question. The Python API does not raise; whether the resulting orthomosaic differs fromMosaicBlendingis left for a future Tier 3 article.- Tie-breaking in Disabled / Max / Min is non-deterministic
across runs. The qualitative behaviour (per-region
winner, brightest-image-wins, dimmest-image-wins) is stable,
but the exact per-pixel choice in the central region varies
between runs of the same script with identical inputs. The
reproducer's figure-generation step skips overwriting the
existing JPEG by default to avoid spurious diffs; pass
--regenerate-figuresto refresh.
See also
- Texture in Metashape 2.3 — what changed and why your scripts may need updating — the surrounding API changes that landed alongside Natural in 2.3.
References
- Agisoft Metashape Pro User Manual 2.3 (English), section Build Texture > Blending mode (paragraph descriptions for the six modes).
- Agisoft Metashape Python API Reference 2.3.1, chapter 1
General concepts >
Metashape.Chunk.buildTexture(kwarg documentation). - How to analyse Model UV Statistics? (Agisoft KB) — assessing the resulting texture atlas (Fill ratio, Overlap, Resolution) after choosing a blending mode.